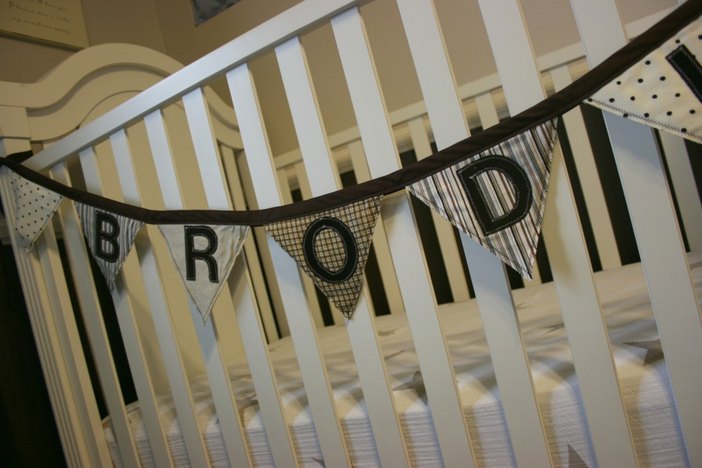
A fabric bunting banner can be used in many different ways. It’s a versatile and fun DIY project that will give you more life and use as opposed to a paper bunting banner.
I’ve made and seen these for use around the home as decoration (in playrooms, children’s bedrooms, home offices, living rooms, etc.) and as a seasonal decoration for the holidays.
The best part about a DIY bunting banner is that you can fully customize it to your style, colors, theme or the word of your choice. I made one to match my son’s bedroom and hang it high above his crib as a safer alternative to other popular nursery décor. Because we live in earthquake territory, and because I know the dangers of hanging heavy objects above a crib or bed, I prefer to accent the wall above my children’s beds with semi-permanent or super lightweight design options. A fabric bunting banner is a great way to decorate above a bed as is a stenciled and painted design or quote or even removable vinyl lettering.

To make your own bunting banner, you will need basic knowledge of a sewing machine.
Materials
- Between 1/2-inch and 1-inch double fold bias tape
- Coordinating fabric
- Sewing machine
- Thread
- Scissors
- Cardboard or cardstock paper
- Pins
- Washable fabric marker for sewing
- Stencil letters (optional)
Directions
- Determine if you will be spelling out a name or word for your banner. This step is important to be done first as it determines the length and size of your finished product.
- If you are spelling out a name or a word, determine if you would like blank triangles at the each end of the word or if the entire banner will be the word alone.
- Based on the length and space of your desired location for the banner, determine the size you will need your triangles to be. If you have a smaller wall space or a longer word, you might need to make your triangles smaller than you first anticipated.
- On a piece of cardboard or cardstock paper, draw and cut a triangle to use as your template.
- Place your template on your fabric(s) of choice and cut as many triangles as you need. You can make each triangle one-sided or double-sided. If you choose to make each triangle double-sided, you will need to cut double the amount of triangles. I would recommend a double-sided banner if you will be hanging it across a room instead of flush against a wall. A double-sided banner also adds more stability to the design, but it’s an optional step if you are hanging it against a wall.
- Lay your triangles in a row to determine the spacing, then cut your double fold bias tape. Leaving at least six inches on each end.
- If you are adding letters, trace each letter onto a solid-colored fabric, cut, pin to each triangle and sew in place.
- If you are making a double-sided banner, sew the triangles together with a straight or zigzag stitch.
- Place the triangle top edges inside the double fold bias tape and pin in place.
- Sew along the edge to secure the triangles in place.
That’s all there is to it! If you’ve made a bunting banner, share with us your theme.
Written by:
Christina Holt, Writer/Teacher- Mommy Loves Coffee


